TM 9-2320-365-34-1
Figure D-46. Battery 12V Cable Assembly
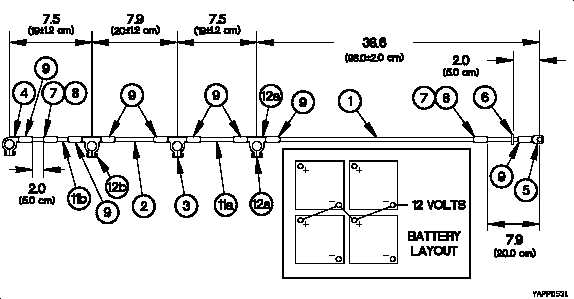
a. All dimensions are in inches (millimeters).
b. Strip 0.69 in. (13 mm) insulation from ends of three cables (1, 2 and 11).
c. Install band marker (6) on cable (1) at position shown in Figure D-46. Battery 12V Cable Assembly.
d. Mark two marker sleeves (7) in ink with characters 1/8 in. (3 mm) high, as follows: 19207-12378575.
e. Install marker sleeve (7) on cable (1) at position shown in Figure D-46. Battery 12V Cable Assembly.
f. Install marker sleeve (7) on cable (11) at position shown in Figure D-46. Battery 12V Cable Assembly.
g. Install sleeve (8) on cable over marker sleeves (7).
h. Install sleeve (8) on cable over marker sleeves (7).
i. Stamp 12V using metal stamping tools on lug terminal (5). Make sure 12V is stamped on lug terminal side that
can be seen when battery 12V cable assembly is installed on vehicle battery. See battery layout in Figure D-46.
Battery 12V Cable Assembly.
j. Stamp a plus (+) sign using metal stamping tools on lug terminals (3 and 4). Make sure (+) is stamped on lug
terminal side that can be seen when battery 12V cable assembly is installed on vehicle battery. See battery layout
in Figure D-46. Battery 12V Cable Assembly.
k. Stamp a minus (-) sign using metal stamping tools on two lug terminals (12). Make sure (-) is stamped on lug
terminal side that can be seen when battery 12V cable assembly is installed on vehicle battery. See battery layout
in Figure D-46. Battery 12V Cable Assembly.
l. Install sleeving (9) over each end of cable (1).
m. Install sleeving (9) over each end of cable (2).
n. Install sleeving (9) over each end of cable (11a).
o. Install sleeving (9) over each end of cable (11b).
p. Insert ends of cable (11a) into lug terminals (12a and 3). Make sure lug terminals are turned so stamped marks
on lug terminal sides can be seen when battery 12V cable assembly is installed on vehicle battery. See battery
layout in Figure D-46. Battery 12V Cable Assembly.
q. Crimp lug terminals (3 and 12a) to ends of cable (11a).
r. Insert end of cable (2) into lug terminal (3).
s. Crimp lug terminal (3) to end of cable (2).
t. Insert end of cable (2) into lug terminal (12b). Make sure lug terminals are turned so stamped marks on lug
terminal sides can be seen when battery 12V cable assembly is installed on vehicle battery. See battery layout
in Figure D-46. Battery 12V Cable Assembly.
u. Crimp lug terminal (12b) to end of cable (2).
v. Insert end of cable (11b) into lug terminal (12b).
D-51