TM 9-2320-365-34-1
D-25. BATTERY 24V CABLE ASSEMBLY 12378576
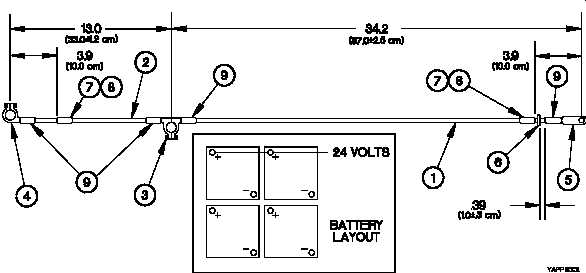
Make the Battery 24V Cable Assembly from electrical cable, lug terminals, and sleeves according to the following steps.
Refer to the following parts list and Figure D-48. Battery 24V Cable Assembly for details. Refer to specification Mil-
B-43436 for requirements.
Item
Part Number
Material Description
Size
Qty
in.
mm
1
12378873-050
Electrical cable 2 AWG
33.5
851
1
2
12378873-050
Electrical cable 2 AWG
11.8
300
1
3
12414644-001
Positive Terminal
1
4
12414644-003
Positive Terminal
1
5
M20659-120
Terminal, Lug
1
6
M43436/1-3
Band, Marker
1
7
12414663-006
Sleeve, Band Marker
1.0
25.4
2
8
M23053/5-210C
Sleeve, Cable
1.0
25.4
2
9
M23053/4-3050
Sleeving
1.0
25.4
4
10
12414580
Adhesive Thermoplastic
A/R
Figure D-48. Battery 24V Cable Assembly
a. All dimensions are in inches (millimeters).
b. Strip 0.69 in. (18 mm) insulation from ends of cables (1 and 2).
c. Install band marker (6) on cable (1) at position shown in Figure D-48. Battery 24V Cable Assembly.
d. Mark two marker sleeves (7) in ink with characters 0.13 in. (3 mm) high, as follows: 19207-12378575.
e. Install marker sleeve (7) on cable (1) at position shown in Figure D-48. Battery 24V Cable Assembly.
f. Install marker sleeve (7) on cable (2) at position shown in Figure D-48. Battery 24V Cable Assembly.
g. Install sleeve (8) on cable (1) over marker sleeve (7).
h. Install sleeve (8) on cable (2) over marker sleeve (7).
i. Stamp 24V using metal stamping tools on lug terminal (5). Make sure 24V is stamped on lug terminal side
that can be seen when battery 24V cable assembly is installed on vehicle battery. See battery layout in Figure
D-54