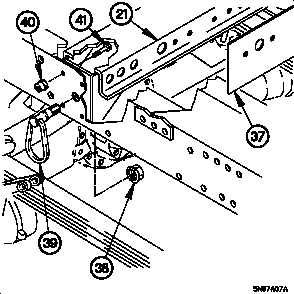
TM 9-2320-365-34-213-7. SHOCK MOUNT CROSSMEMBER REPLACEMENT (CONT)(10) Remove self-locking nut (38) and ring (39) from shockmount crossmember (21). Discard self-locking nut.CAUTIONWhen removing bolts, continuous removal ofcollars is mandatory. Failure to comply willresult in seizing of collar to bolt.(11) Remove four collars (40) and bolts (41) from shockmount crossmember (21). Discard collars and bolts.(12) Perform steps (4) through (11) on right side of shockmount crossmember.(13) Position valve panel (37) to gain access to shock mountcrossmember (21).(14) Remove shock mount crossmember (21) from vehicle.b. M1078/M1079 Installation.NOTE• Left and right side of shock mount crossmemberis installed the same way. Left side shown.• Steps (1) through (24) require the aid of anassistant.• Install plastic cable ties as required.(1) Position shock mount crossmember (1) on vehicle withfour bolts (2) and self-locking nuts (3).(2) Tighten four self-locking nuts (3) to 210-225 lb-ft (285-305 N·m).(3) Position ring (4) in shock mount crossmember (1) withself-locking nut (5).(4) Tighten self-locking nut (5) to 113-138 lb-ft (153-187N·m).13-20 Change 1
Integrated Publishing, Inc. - A (SDVOSB) Service Disabled Veteran Owned Small Business