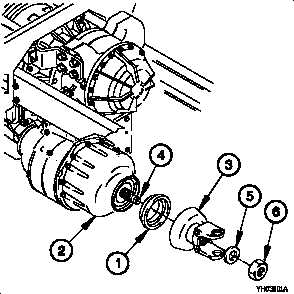
TM 9-2320-365-34-2(4) Remove self-locking nut (7) and washer (8) from shaft(9). Discard self-locking nut.(5) Remove drive yoke (3) from shaft (9).(6) Remove seal (10) from housing (11). Discard seal.b. Installation.(1) Apply a small amount of grease to outside edge andspring cavity of seal (1).(2) Install seal (1) in housing (2).(3) Visually verify seal (1) is properly seated.WARNINGAdhesives, solvents, and sealingcompounds can burn easily, can give offharmful vapors, and are harmful to skinand clothing. Keep away from open fireand use in a well ventilated area. Ifadhesive, solvent, or sealing compoundgets on skin or clothing, washimmediately with soap and water. Failureto comply may result in injury topersonnel.(3.1) Apply sealant to both sides of washer (5).(4) Position drive yoke (3) on shaft (4) with washer (5) andself-locking nut (6).(5) Tighten self-locking nut (6) to 450-600 lb-ft (610-815N m).Change 1 8-9
Integrated Publishing, Inc. - A (SDVOSB) Service Disabled Veteran Owned Small Business